Summary
This sensor was designed specifically for the motor racing
industry. It meets the demands of the harsh environment experienced
in modern motorsport. One particular application of the sensor (in
the Australian V8 Supercar seires) has seen these sensors do four
seasons of service - their prior sensors only managed about nine
months of service before failing due to vibration.
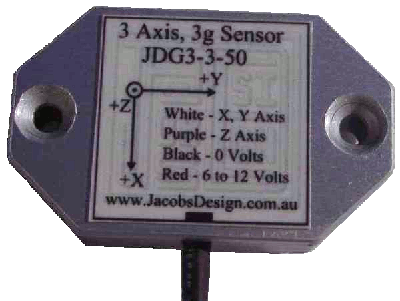
The sensor is a three-axis (X, Y, Z) sensor with each axis orthogonal
to the others, measuring positive and negative g forces in each of the
3 axes.
The development of this sensor had the following design goals:
- Triple axis g-force sensing
- Analog outputs - for easy integration into a variety of
data acquisition systems
- Rugged design
- Cost competitive
History
The g force sensor was developed in 2007. It started life as a
spin-off of a larger project, but has since found a larger market
than the original project!
Specifications
| Parameter | Minimum |
Typical | Maximum | Units | | Measurement Range | 3 | 3.6
| - | g | | Zero g Voltage | 1.3 | 1.65
| 2 | V | | Sensor Output Voltage | 0 | -
| 3.3 | V | | Sensitivity | 290 | 330
| 370 | mV/g | | Stability | - | +/-0.015
| - | % per degree C | | Temperature Range | -20 | -
| 70 | degrees C | | Nonlinearity | - | +/-0.3
| - | % | | Inter-Axis Alignment Errors | - | +/-0.1
| - | % | | Cross-Axis Sensitivity | - | +/-1
| - | % | | Supply Voltage (See note 1, 2) | 6 | -
| 12 | V Sensor Supply | | Supply Current | - | 1
| - | mA | |
Notes:
- DO NOT connect the sensor directly to
the vehicle battery. The sensor is not capable of dissipating the
energy caused by load dump conditions.
- The sensor is not specified for a 5V supply. However, many
users have operated the sensor at 5V without problems - although
there may be some loss of maximum +g range.
Wiring the G-Force Sensor
The sensor requires a supply voltage of 6 to 12 Volts, which must be from a
protected source.
DO NOT connect the sensor directly to the
vehicle battery.
The g-force outputs from the sensor are analog voltage levels that may be
fed directly into the 5 Volt analog input of a data acquisition system. If
excessive electrical noise is present, then a shielded loom may be required.
The sensor is supplied with a pigtail loom.
 |
Red - Supply Voltage (6 to 12V)
Black - 0V / Chassis
White - X-Axis Analog Output (0 to 3.3V)
Yellow - Y-Axis Analog Output (0 to 3.3V)
Purple - Z-Axis Analog Output (0 to 3.3V) |
Mounting the G-Force Sensor
Rigid Mounting
M4 countersunk bolts may be used to mount the sensor when a more direct
coupling is required. Excessive vibration "may" swamp the g-force measurements.
However, this method of mounting has proven successful in a V8 Supercar (with the
sensor mounted to the driveshaft tunnel).
Rigid mounting is recommended for the 100g sensor.
The top view of the accelerometer is as follows:
(all dimensions in mm)
Flexible Mounting
Double sided tape or Velcro may be used to mount the sensor when an amount of
"shock filtering" is required.
Calibration : How is it performed?
The accelerometers have an output voltage which is linear across the operational
range of the sensor. Each axis of the sensor may be considered independent of
the other axes in the same sensor.
X and Y axes
| 1. | Place the sensor on a flat surface with the label facing
upwards. |
| 2. | Set the X and Y axes to each read 0g. |
| 3. | Place the sensor on a flat surface with the output wire
facing upwards. |
| 4. | Set the X axis to read -1g. |
| 5. | Place the sensor on a flat surface with the +y arrow in
the vertical direction. |
| 6. | If the arrow is pointing down, then set the Y axis to read
+1g. If the arrow is pointing up, then set the Y axis to read -1g. |
The calibration of the X axis and Y axis is now complete.
Z axis
The Z axis (vertical) is a special case and may be calibrated as either an
absolute or a relative g-force reading:
Absolute - Calibrate the sensor to read 1g when placed flat and -1g when
placed upside down. In this calibration the vehicle will have a g-force
reading of 1g straight down while the vehicle is stationary.
Relative - Calibrate the sensor to read 0g when placed flat and -2g when
placed upside down. In this calibration the vehicle will have a g-force
reading of 0g on all axes while stationary.
|
|
|
• Price includes postage - local and international
• Price includes GST - for Autralian customers
• Import duties and taxes are the responsibility of the purchaser
• All accelerometers come with a 12 month warranty
• Discounts apply for bulk purchases -
contact us for further details. |
G-Force Part Numbering System
The part number consists of 3 parts:
| JDG3-3-50 |
This part is a 3-Axis g-force sensor. The other option would be JDG2 for a
2-Axis g-force sensor. |
| JDG3-3-50 |
The (typical) full scale response of this sensor is +/-3g's on each of its
axes. |
| JDG3-3-50 |
This parameter indicates the cutoff of the first order filter. The filter
is factory set and can not be changed by the user. The default filter rate is 50Hz.
Filter settings available are: 1Hz, 2Hz, 5Hz, 10Hz,
20Hz, 50Hz, 100Hz, 200Hz, 500Hz.
The sample rate should be set to at least twice the filter frequency. This
is required to satisfy the Nyquist criteria - avoiding higher frequency g-force
components appearing as low frequency g-force components. |

 Home
Home